13 Aug 2018
Tips & Insights
Tips & Insights
News
alexbes dominated one of our previous PBR (Physically based rendering) challenges by winning in both categories. We asked him to answer a couple of questions about his design work, and he was very generous with his time, sparing no detail and going in-depth into his workflow. Bookmark this great interview and share it with your friends, because it really is a goldmine of PBR knowledge.
Hey everyone! My name is Alexander, I'm 26. I live in Saint Petersburg, Russia and I've been in the industry for about 4 years.
For me 3D started as a hobby at school, somewhere around the 8th grade. I've always been interested in computers and tech, I've also been fascinated by photography and graphic design. One time, my father brought a 3D magazine, showed me one of the works and asked if I was able to create something similar to it — I didn't have any idea how that was done at the time. It all started from there.

Game ready Japanese sign set by alexbes
The first 3D software I taught myself was NewTek Lightwave, which was used by the author of that work in the 3D magazine. As I found out later, Lightwave wasn't very popular, and it was hard to find any tutorials or articles about it. After that I've tried a bunch of other programs, like Cinema4d, 3Ds Max, Modo, and finally arrived at Maya.
After I got my first higher education degree in Engineering, I decided that engineering was not for me. I wanted to do something more artistic and decided to apply for a second degree, this time in graphic design. At the end of the second year, I got an opportunity to try myself as a 3D artist in a small indie studio. I was a bit 3D savvy, so I decided to apply.
The work at the indie studio was a great experience — I had to do everything from modelling to rigging, scripting and working with the engine. The project we were working on was based on Unity 4. At that time there wasn't a lot of information about PBR, and you could only find some information on sites like Polycount.
From there, I started to be heavily interested in everything 3d and was learning a lot every day. PBR started to gain popularity by the end of the second year of the project. Somewhere around that time, Unity 5 with the PBR Standard Shader was announced, and advanced texturing tools started to evolve: Quixel Ddo, then Allegorithmic Substance. Unity 4 didn't have PBR, and the team wasn't going to transition to Unity 5, so I had to dig into PBR in my spare time after work.
As time passed by, the work at the studio was becoming quite repetitive and there was no definite deadline on when the project should be finished. I decided to move on and find a place where I could brush up my skills and become faster at producing better works. This is how I turned up at Trace Studio — a Russian outsource company that currently works on some of the world's best AAA projects.

Game ready hammer by alexbes
I started as a junior artist and climbed my way up to become the project lead, who I am now. Since that time, I've had the chance to put my hands on several projects, the largest of which is Call of Duty Infinite Warfare, which was published a year ago.
I was able to learn a lot of useful things and even now, two years later, I continue to discover something new almost every day. By the way, we're always looking for new talents, so if you feel capable, drop us a message and we'll be glad to talk to you.
Unfortunately, I don't have a lot of time for modeling at my current position, because the largest part of my day is devoted to administrative tasks. I try to dedicate as much spare time as I can to modeling to keep myself in shape.
At the time when PBR started getting attention there practically wasn't any documentation on the topic, which is why it was hard to grasp even the basics. My first PBR models violated PBR rules almost completely, everything was made by guesstimating — in the engine the models looked off, the textures were inconsistent from model to model, etc. It wasn't clear how to convert a model from Specular/Glossiness to Metallic/Roughness and vice versa, when there was you needed to make a model for different engines/shaders.

Game ready used wooden baseball bat by alexbes
For a lot of people, transition from a classical texturing pipeline to PBR seems unnatural: artists, especially those who have worked in the industry for a long time, try to spice things up by adding shading information into the diffuse map, using random values and tweaking maps for specific lighting conditions, which is not what PBR is about. The whole purpose of PBR is to transfer a lot of work to the shader and not to incorporate any additional info into the maps.
If you grasp the basics of PBR, it'll help to simplify the process of texturing by allowing to quickly achieve realistic results in any lighting conditions.
I'll try to briefly describe my whole process from start to finish.
Before I start doing anything, I try to gather as many reference images as possible. I look into 3 main areas: the silhouette, geometric details and surface texture of an object. I use PureRef to organize references, it's a really convenient program. It's free, but you can donate a couple of bucks to the developers. You can see an example of how my reference sheet looks like below. My main sources of reference are photo stocks like Shutterstock, where you can find almost anything in a couple of minutes, because all images have well assigned keywords. Other places to look are of course Google and, less often, Flickr.

Image provided by alexbes
I create a basic blockout in Maya based on the reference images. At this stage, the geometry looks really dirty: I don't pay attention to intersections, excess vertices, holes and so on. The purpose of this stage is to get the basic proportions right.
After the blockout stage is done, I start to plan the technical execution of the model: how to fit the UVs into the desired texel density and do it in the most efficient way. Performance is a crucial requirement for real time models. This is a key stage, and any mistakes here will cost a lot of time in the following stages.
I try to understand which parts of the model will be the most visible to the player, where to put the highest polycount, which parts will be baked, and which should use tiling textures. I also try to decide whether the model should be a part of the set or a standalone prop. If it is a part of a set, it makes sense to create a texture atlas to save a little bit of memory and draw calls in the game.
You can see how I approach planning in the image below.

Image provided by alexbes
After everything is planned, it's time to start modeling. I create a high-poly mesh to bake from for parts that will be baked. For other parts, I add bevels to make shading a bit more pleasing to the eye than with hard edges. These parts will be using tiling textures. If your object is large or you plan on using intricate details for close-up shots, it's a good idea to use either a 2nd UV set or decals, as it'll help to break up repetition, if you're not too tight on resources.
For a long time, I was using Substance Designer for baking, because it allowed to bake models without exploding (taking meshes apart to bake pieces separately to eliminate artifacts). Not long ago, Toolbag 3 appeared with a similar functionality. In Toolbag you can change the cage distance at any point of the mesh with a simple brush stroke – very convenient! It also has a quick preview of the bake, so you can spot baking errors even before hitting bake. All in all, I haven't seen a better tool for baking.
I use Substance Painter for texturing. I think it's the most stable and convenient texturing tool, it's also one of the first tools to support PBR.
In the beginning, I don't pay too much attention to make sure the texture complies with PBR rules, it's better to fix this at later stages and focus on the artistic part first.
I start every texturing process by assigning basic fills to different pieces. This way I can get a feeling of the overall color palette early on. I try to organize everything into folders from the start — I like everything to be structured, because then it will be much easier to adjust the file later.
The bulk of the texturing process is finding the right materials, combining them together and constructing material masks for wear, dirt and so on. I rarely create materials from scratch.

Game ready medieval screwdriver by alexbes
Substance Painter is a great tool for generating masks based on a bunch of input maps: normal, curvature, AO, etc., but I don't recommend leaving generated masks as is, because a lot of times they look too uniform and unnatural. Just pick a brush and try to break the uniformity a little.
I test my textures in the engine to see how they look in the final environment. You can do this in real-time with the latest versions of Painter. It has a feature called Live Link that exports textures to the engine in real-time and your adjustments to textures are visible right away.
When I'm done with texturing and I like the overall result from the artistic standpoint, it's time to make final adjustments to make my maps comply with PBR rules. The first thing I do is find PBR values for the engine I'm using. Each engine/renderer has its own chart of values. For example, values for Unity materials can be found here. Unreal material values are here.
After you find the material values, it's time to replace your diffuse and spec values on all of the materials with the ones you've got – sounds like a lot of work…But in reality you can just tweak all of your values simultaneously to be in the correct ranges by using levels, HSL sliders, etc. – not as accurate as replacing values, but much faster and you can even do it in Photoshop.
The light which interacts with the surface can be split up into 2 main components: diffuse light and specular light. These components are clearly represented in the Specular/Glossiness workflow. Diffuse light is the light that passed through the surface and came out, while specular light is the light that was reflected straight away.
The Metallic/Roughness workflow represents the same data, but in a slightly different way. To put it simply, the diffuse and specular information exists in a single map – Base Color. To tell a shader which areas of the map are specular, and which are diffuse we need to use a mask – the metallic map. Here a value of 1.0 represents metal reflectance in the base color and a value of 0.0 represents diffuse for non-conductors. You can't assign different reflectance values for non-conductors as they're fixed at a constant value in this workflow.
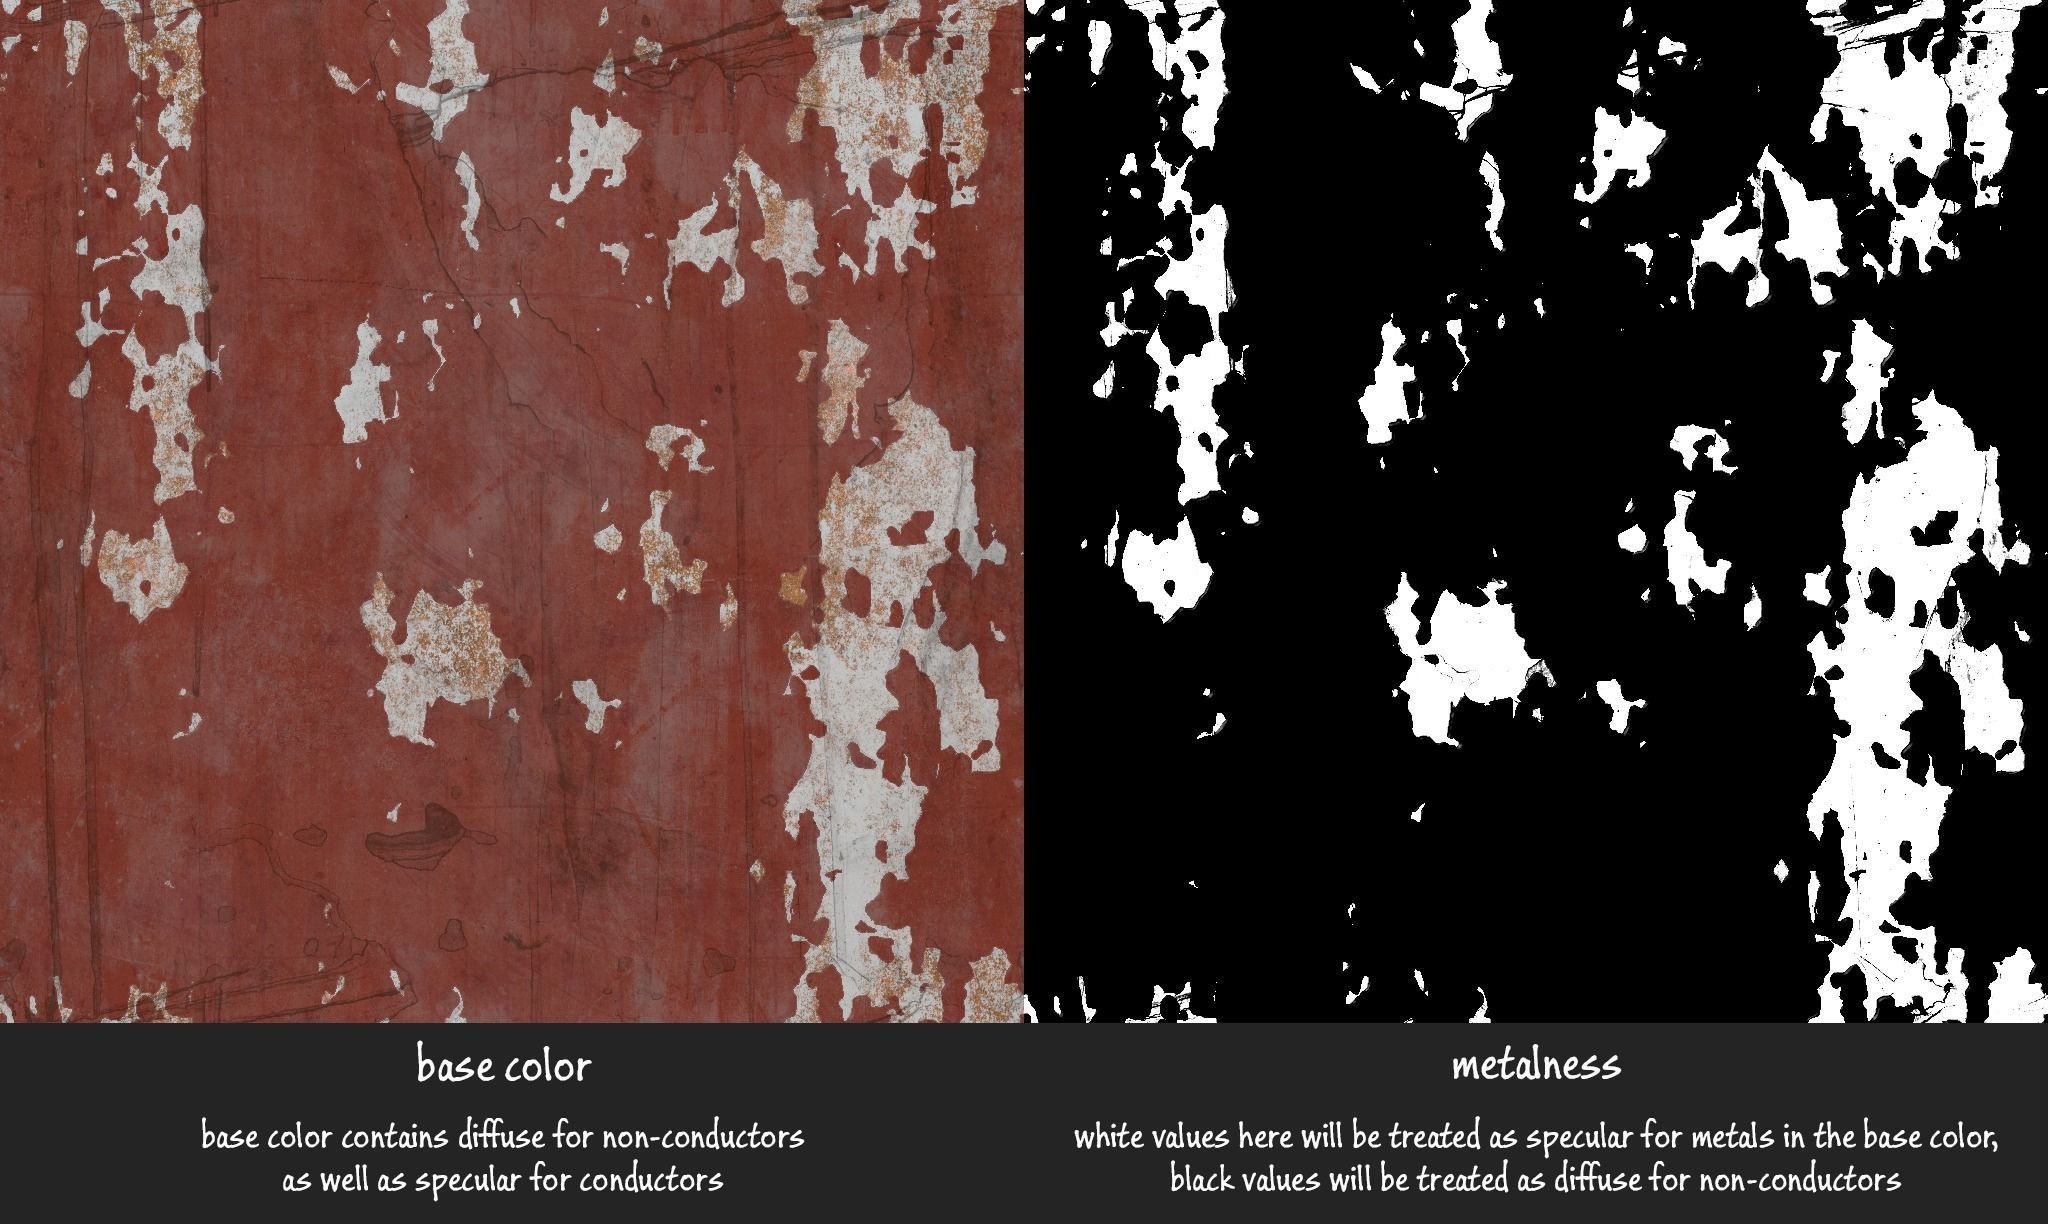
Image provided by alexbes
In everyday lives, we don't see objects that completely absorb or completely reflect all of the light they interact with, this is why PBR sets a guideline artists should follow: each map in PBR has its own range of values. Breaking this rule will result in materials being too dark or too light. This rule is valid for both workflows.
Let's pick Unity’s Metallic Value Chart as an example. There's a gradation on top of the chart which says that base color for non-metals should be in the 50-243 range and metal values are in the 186-255 range. This is due to the fact that non-conductors can't completely absorb or reflect all of the light. You've also probably noticed that these value ranges overlap. This overlap can be used for making non-pure metals, like aluminum covered in dust.
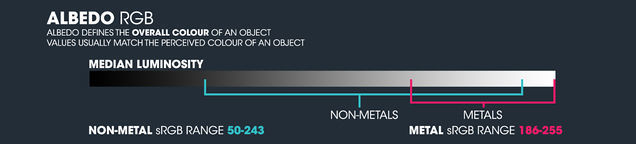
Image provided by alexbes
Despite having rules, PBR leaves room for creativity and the most creative map in each workflow is glossiness or roughness, which are inverted copies of one another. I think this map holds a lot of value and it can make or break the feeling of realism of the model. Glossiness describes how perfect is the surface: 1.0 means completely perfect and 0.0 means completely rough. There are no strict rules for authoring this map, but I'd suggest avoiding using extreme values, as there is nothing 100% perfect in real life.
When working with glossiness, I start with painting base values with a Gaussian brush to describe big shapes and transitions. On top of that, I'm layering scanned textures of scratches, dirt, smudges and so on from my library as a filler and then removing a few details to reduce the amount of noise. As a finishing stroke, I add a couple of unique details by using stencils to make the object less generic.

Image provided by alexbes
When I was only getting started in PBR, it was unclear how to use charts, so I'd like to give a quick step-by-step example for those who are new to the field.
Let's say I want to create physically correct copper material for Unity with the Metallic/Roughness workflow in Painter. For this I'll open Unity's Metallic Value chart, then I'll create a new fill layer, and select a base color from the copper sample by using a Picker. I'll then set a metallic slider at 1 – pure metal. I set the Roughness value according to my own taste. And here it is — PBR copper.
As all of my experience comes from art production for games, I haven't really used IOR. In games we use Specular or Metallic to define reflectivity of a surface.
As a final note I would say If you're working for yourself choose a workflow that fits you best, there's no big difference between them, visually you can achieve similar results.
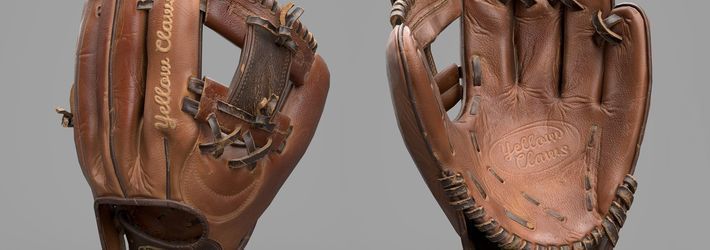
All of the works I make in my spare time are quite small and simple, they're almost the same in terms of difficulty. But I can clearly say which one is the most popular – the baseball glove. It's the one that earned me first places in two nominations in CGTrader's PBR Challenge.

Game ready leather baseball glove by alexbes
Unfortunately, I don't have any now, but I plan on recording a few "making of" videos so everybody could see what my processes are like. Also, if you have any questions, feel free to drop me a line.


Comments