M
masonje


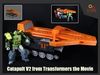


With the release of SS86 Springer, it's time to refresh one of our favorite projects from back in the day - the Catapult from the 1986 Transformers the Movie! Here's a rotating turntable view of it.
Once all printed and assembled, here's how it would look and scale alongside SS86 Springer.
And a quick look from the other side of the catapult. We've tried hard to make it a nice homage to how it looked in the movie, scale nicely and also operate smoothly.
Being also designed around the missile which came with Springer, this should be able to yeet it with much force at any pesky 'cons in the way! Though in order to now damage the original accessory, we much prefer to use the 3d printed version we did eariler - https://www.patreon.com/posts/112655555
A dangerous view down the front of the barrel, so to speak! Also took the chance to add in the front facing headlights or lamps in there! At the rear are the controls for the catapult with its loading breech and keyboard for the onboard targeting computer.
At least we assume there should be an onboard targeting computer, so this is where the catapult missile can be fed in, travelling up an internal loader ramp. Gotta remember to hold the catapult arm back, for it to work as intended. And finally land up topside on the catapult deck - primed and ready to get yeeted off!
The larger scale of the project also allowed for some fun design additions, such as having the rear monitor open up to reveal a little hiding spot for any loose accessories or effect parts.
And two circular side motifs on the flank have also been designed as separate pieces, so they can be printed in different colors and also open up to reveal a couple of 5mm pegs where small accessories or effect parts can be stowed safely.
5mm ports are also found in various parts of the body so you can peg stuff on!
Here's a peek at the main action component for this build - the catapult arm and deck, which are connected via a thick elastic rubber band. (More on the assembly of this below)
=== Assembly ===
The included diagram shows the assembly of the catapult. Due to its many parts, we've divided the build into these color-coded sub-assemblies.
For clarity, there's each of the exploded views of these sub-assemblies. These are also numbered accordingly in the zip file.
For the main elastic mechanism which drives the catapult arm, here's how the parts need to be put together:. With a thick rubber band, first loop one end around the FrontAnchor piece and notch that into place on the Deck-LowerFront piece.
The other end of the rubber band goes into the ArmMain part, and is notched into place using the ArmPeg
From testing, we've found that if you leave the rubber band simply looped around, the force of the action may start to damage or snap parts when they impact upon on another. To avoid that, and also add a bit more elastic strength to the band, we advise knotting the band midway as shown here:
On a similar note - due to the forces involved, we recommend printing ArmMain, FrontAnchor and Deck Pegs with higher walls and infill settings. Alternatively, when you do break pieces accidentally, that's probably a sign to reprint those bits with higher settings :)
Hoping that you would all enjoy printing and putting together this revised catapult, as much as we did designing it (notwithstanding the many painful iterations!)
Hope this would be a nifty addition to your SS86 Movie collections too. Enjoy and happy 3d printing! =)
===
This model is not to be uploaded or sold in any form and is intended for personal use only.
Check out more of what we are up to over at our Facebook Page (http://www.facebook.com/FunbieStudios) or website (http://www.FunbieStudios.com/)
Support us on Patreon - https://www.patreon.com/FunbieStudios | Full listing of Models - https://funbiestudios.com/model-catalog


