Turn your old GoPro Hero 5 Session into a long-lasting recording beast!
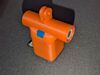
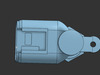
Introducing the GoBoost Hero — a precision 3D-printable case and adapter kit that lets you replace your GoPro Session’s internal battery with a powerful, removable 18650 lithium cell. Designed for creators, FPV pilots, adventurers, and modders, this upgrade unlocks hours of runtime and revives your retired Session 5.
It's not yet perfect, but it will give you a good enough base to work off. Ive spent countless hours printing and testing with essentially no information to work off besides my physical Gopro Hero 5 Session.
Electronics & Components:
1x 18650 lithium battery (flat-top, branded like Samsung, LG, Sony – NOT a cheap eBay cell!)
2x battery springs (1 positive, 1 negative)
2x short wires (16–22 AWG, red & black preferred)
1x JST-PH 2.0 connector or directly solder to GoPro battery pads
Tools & Materials:
Soldering iron & solder
Wire stripper/cutter
Hot glue gun or super glue
Multimeter (optional but recommended for checking polarity)
(Optional) Kapton tape or heat shrink tubing for insulation
Instructions
Step 1: Remove the Old CaseCarefully pry open the original GoPro Hero 5 Session case using plastic pry tools or a hobby knife. check a youtube video if help is needed.
Work slowly — avoid damaging the internal BMS board or ribbon cables.
Step 2: Remove the Old BatteryLocate the original battery inside (it’s wrapped and connected via a short wire to a small Battery Management System (BMS) board).
Gently cut or desolder the wires connecting the battery to the BMS — DO NOT damage or remove the BMS!
You’ll keep using the BMS for safe power regulation.
Step 3: Solder Wires to the BMSSolder a red wire to the B+ pad (positive) and a black wire to the B- pad (negative) on the BMS.
These wires will run to the 18650 battery contacts.
Tip: Use a multimeter to confirm polarity before continuing.
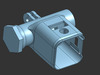
Step 4: Install Battery Springs into Case Part 2Take GoBoost Hero Case Part 2 (the back part of the case).
Position your battery springs inside the designed holder slots.
This part is a bit tricky — use tweezers if needed.
Secure the springs with hot glue or CA glue + heat.
Ensure one spring touches the flat end (−) and one touches the button end (+) of the 18650 battery.
Step 5: Solder Wires to Battery SpringsSolder the red (+) wire from the BMS to the positive spring contact.
Solder the black (−) wire to the negative spring contact.
Make sure the wires run cleanly through the channel holes in the 3D printed case so they don’t get pinched when assembling.
Step 6: Glue Case Parts TogetherAlign Case Part 1 and Part 2 carefully.
Use hot glue sparingly around the seam to secure the two case halves together.
Double-check wire placement and spring alignment before sealing.
Step 7: Insert ButtonsFit the shutter button and mode button into their respective cutouts.
Test press fit — they should sit flush and click the internal switches properly.
Step 8: Slide Camera Unit into the CaseGently slide the GoPro mainboard + lens module into the completed shell.
It should fit snugly, with the lens aligning with the front hole and the buttons pressing cleanly.
Tuck in any extra wire slack if needed.
Step 9: Secure the Camera with a Seam of GlueOnce the camera module is in place, apply a very thin bead of hot glue around the seam between the camera body and the 3D printed shell.
This seals it and prevents dirt, moisture, or vibration.
Final Checklist:Insert 18650 battery and test power-up.
Test video recording and button function.
Optional: Add charging port or external connector if needed.
Disclaimer:I am by no means a professional designer, it took me a really really really long time to do this so your support is appreciated more than you can imagine.
3D printing settingsUse desired infill, scale down to 10% of STL. I used cm instead of mm but everything is quite dimensionally accurate.