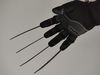
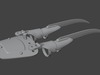
Designed based on the bladed glove depicted in the original Nightmare on Elm Street franchise, featuring one of the most memorable characters in the horror genre, this 3d print friendly bladed prosthetic is easy to print and assemble. Designed to fit an adult hand, simply print and snap together the parts to form the final prosthetic, which can then be easily slipped onto a glove. Simple gardening gloves, a somewhat thin insulated glove, or any leather or cloth glove should work. The parts can be sized down, but the parts will get thinner, decreasing overall strength. If resizing, do the same for all parts or things will not fit consistently. The prosthetic can be worn without a glove, but it will probably be loose, depending on the hand.
**
Print Settings and Preferences**
My preferred slicer is Cura, using tree supports.
Print at 0.1 to 0.2mm thickness 100% infill.
This design was tested on a customized FLSUN Q5 (Delta Printer), with a 0.6mm nozzle. Supports are required for most parts.
The blades can be printed flat, but they have a slight taper, so I printed them blade up, with supports on the curved tip.
The finger parts are best printed at a vertical angle, with supports. This adds some strength, allowing curved surfaces more flex.
In general, I tend to set wall counts to 3 or 4 and set wall overlap to at least 15%, again for increased strength. 20 to 25% is better.
The palm plate, was printed vertically, since it mainly anchors the base of the finger hinges to the glove.
This design or parts of it can be printed on a resin printer for cleaner results.
**
Print Parts for one hand**
1 palm plate3 Long Fing Base3 Long Fing Tip1 Pinky Tip1 Pinky Base3 long Hinge Pivots1 short Hinge Pivot (for pinky)4 blades
Print Ready Wrist Tether (optional)In addition to the blade prosthetic, I've included print in place chain links and loop ends for the chains. These can be linked and snapped onto the nubs near the base of the palm plate to anchor the prosthetic to the wrist.
Print 2 of the chosen link chains or 1 of each (approximately 125mm long). Link types are interchangeable. There are about 8 links per printed chain.
Print 1 ChainStart and 1 ChainEnd. Be sure to orient the flattest side on the build plate.
Link the print chains and attach the ChainStart to one end.
Thread a plamPlate nub through the wide section of the ChainStart, and then slide the ChainStart until the nub snaps into the narrow section.
Test the length to make sure that the chain can reach around your wrist / glove to the opposite end of the palmPlate, and then remove extra links.
Attach the ChainEnd to the shortened tether and snap it onto the remaining nub.Optional (if not using M4 screws for version 1 of palm plate):4 slideHingePin or 4 hingePin (plastic pins to attach hinges)Glue may be needed to anchor the pins in this case.
**
Assembly**
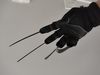
The blades slide into the finger tips from the front. (If they get stuck going in, make sure that the sides of the blades and inner slot are smooth.)
The base of the finger tips slot into the top of the finger bases.
The ends of the finger bases snap into the pronged end of the hinge pivots.
Each hinge pivot can then be snapped onto the pins at the top of the palm plate.
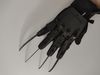
Once assembled, thread the fingers of the glove through the loops of each corresponding finger ring, with the palm plate resting on the back of the glove.
Once in place, a single piece of double-sided tape can be used to secure the palm plate to the back of the glove.Before securing the palm plate, be sure to test the finger movement and range of motion. Make sure that everything is aligned properly. Then secure the palm plate. If no mounting tape is handy, a couple of long rubber bands can be looped over the studs near the base of the plate to tether it to the wrist.