1/4
- Preparation
Reference Images: Collect photos or design drawings of McDonald's restaurants, including the exterior, interior layout, and iconic elements (such as the M logo, red and yellow color scheme).
Blender Basics: Familiarize yourself with Blender's basic operations, such as moving, rotating, scaling, edit mode, and material editing.
- Modeling Steps
-
- Exterior Modeling
- Main Structure: Use a cube to create the basic shape of the restaurant, then adjust the size and proportions in edit mode.
- Iconic Elements:
- Create the M logo: Use the curve tool to design the letter shape, then convert it to a mesh.
- Add red and yellow color zones, differentiating them with materials.
- Create the M logo: Use the curve tool to design the letter shape, then convert it to a mesh.
- Doors and Windows: Use the boolean tool or manual cutting to create openings for doors and windows, then add glass material.
- Exterior Modeling
-
- Interior Layout
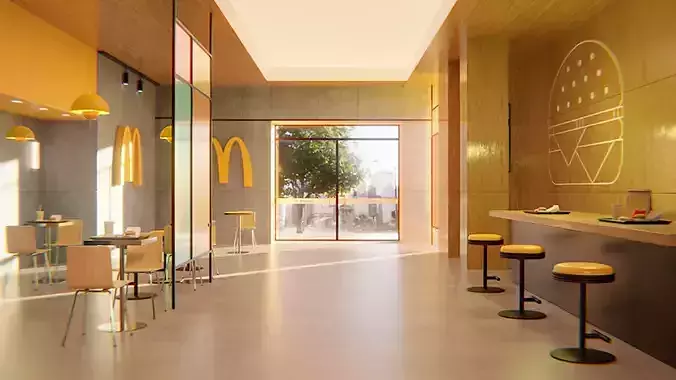
- Dining Area: Create table and chair models, and use the array tool to quickly duplicate them.
- Order Counter: Combine cubes and cylinders to build the counter, and add details like menu boards and cash registers.
- Kitchen Area: Simply model some equipment, such as refrigerators and fryers.
- Decorations: Add McDonald's classic elements, such as burgers, fries, and drink cups.
- Interior Layout
-
- Detail Optimization
- Use subdivision surface to refine the model, making it smoother.
- Add bevels to make edges more natural.
- Detail Optimization
- Materials and Textures
-
Material Settings:
- Add red and yellow materials to the exterior walls.
- Add transparent material to the glass, adjusting the refractive index.
- Add wood or plastic materials to the tables and chairs.
- Add red and yellow materials to the exterior walls.
-
Texture Mapping:
- Use UV editing tools to add textures, such as the McDonald's logo or menu content.
- Download or create texture maps and apply them to the model's surface.
- Use UV editing tools to add textures, such as the McDonald's logo or menu content.
- Lighting and Rendering
-
Lighting Setup:
- Use area lights or HDRI environment maps to illuminate the scene.
- Adjust light intensity and color to create a realistic atmosphere.
- Use area lights or HDRI environment maps to illuminate the scene.
-
Camera Angles:
- Set up camera angles to showcase the restaurant's exterior or interior layout.
- Set up camera angles to showcase the restaurant's exterior or interior layout.
-
Rendering Settings:
- Use the Cycles or Eevee rendering engine.
- Adjust sampling rate, lighting effects, and shadow quality.
- Use the Cycles or Eevee rendering engine.
- Post-Processing
Use Blender's compositor for post-processing, such as adjusting color, contrast, and adding depth of field effects.
Alternatively, export the rendered image to Photoshop or GIMP for further editing.
- Exporting and Sharing
Export the model in common 3D formats (e.g., FBX, OBJ) for use in game engines or other 3D software.
Share rendered images or animations on social media or in your portfolio.
REVIEWS & COMMENTS
accuracy, and usability.


