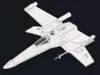
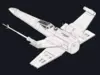
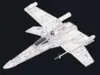
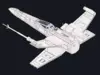
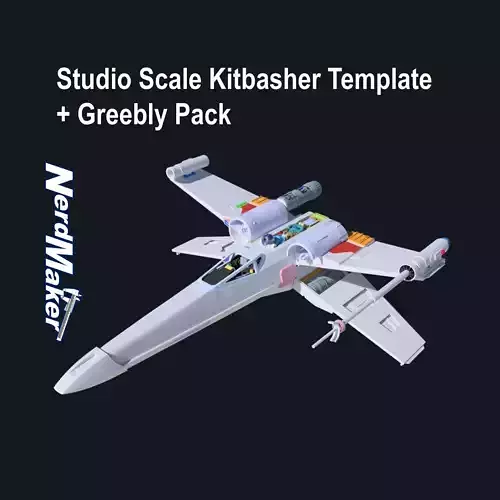
!This is the Kitbasher Template without the greeblies!
Two templates are included that represent two skill levels:
Plain Kitbasher Template (Hard)
- Raw fuselage and wings. No panel lines, no chips and no greeblies.
- Additional bottom fuselage without Torpedo Tubes, to carve them at the position you want.
- The ILM scratch build parts are included: Laser cannon body, wing box, cover, cockpit frame, etc.
Semi Plain Kitbasher Template (Medium)
- Fuselage and wings with panel lines but no chips and no greeblies.
- The ILM scratch build parts are included: Laser cannon body, wing box, cover, cockpit frame, etc.
Features
- 1/24 studio scale when printed in native scale (studio scale = the size they used for the filming miniature)
- Two templates that represent two skill levels
- Armature for articulated S-foils
- 2 Nose shapes
- Astromech droids with turnable head: R2, R4, R5
- Additional Pyro Style Wings (Semi Plain)
- Recesses for magnets in the wing mechanism to easily install the wing covers.The magnets also make closing the wings more tactile and help keep the wings in horizontal position.
- Recesses for magnets in the wing tips to help keep the wings closed.
- 3 Pilots
- Live Action Pilot
- Live Action Pilot with raised hand
- ILM-Style Pilot
- 2 Cockpits
- Live Action Cockpit
- ILM-Style Cockpit (Plain)
- Articulated targeting computer for the Live Action Cockpit
- The Live Action Cockpit has 0,6mm holes for fiber optics
- Cable routing for engine lighting integrated in the wings
- The finished model can be mounted on a threaded stand
- 3D-Printable templates to paint Call Sign Markings included
- Optional Parts for CNC to make out of metal
General Information
You need to have all the original used greeblies to complete the build!
I used my MK II studio scale Model-X to jump off of for this kitbasher template.
The panel lines on the fuselage are from Red 5. The panel lines on the wings are generic and the same on all four wings.
The droid position is from Red 5. If you want a different position you need to adjust it 3.3 mm towards the front.
You need some additional hardware to complete the build. A hardware list is included.
Printing Information
All files are optimized for resin printing (but can also be printed with FDM).
Print the wings and the fuselage with engineering resin (or similar that has little to no flex) to prevent any sagging. Don’t use an ABS-like resin.
Cure the wings and the fuselage very thoroughly immediately after printing for at least 20-30 minutes (washed of course).
Recommended printer build volume for the native scale: 192x120x250 mm (WxDxH)
Min. required printer build volume: 192 x 120 x 200 mm (WxDxH)
- A Commercial License, to sell 3D-Prints of my Models, is available on Patreon > NerdMaker
Join the NerdMaker Community
- YouTube > @DominicSchwarz
- Twitch > nerdmaker86
- Discord > 9jppu3AxJK
- Instagram > @nerd_maker_engineer
- Facebook > nerdmakerengineer