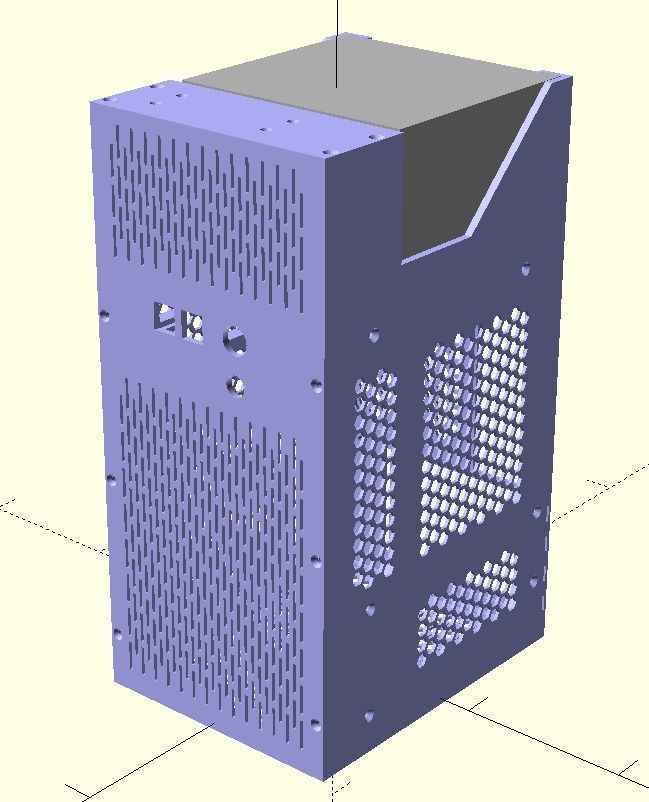
Compact computer mATX case for 3D printing. The parts are connected using M4 bolts with a length of 10 to 20 mm and M4 nuts. The nuts are inserted into the grooves of the side walls of Side.stl and MainBoardPlate.stl.On the Side.stl wall of MainBoardPlate.stl, a mATX motherboard with dimensions of no more than 194mm by 244mm is fixed.Assembly order:
- First, insert the M4 nuts into the grooves Side.stl and MainBoardPlate.stl.
- Place the motherboard on MainBoardPlate.stl and secure with M4 bolts and M4 nuts.
- Secure the front (Front.stl) and back (Back_PCI.stl) panels with the M4 bolts.
- Fix the bottom panel Bottom.stl with M4 bolts.
- Fasten the top panel Top.stl with M4 screws.
- Place the ATX power supply on top of the Top.stl.
- Mount SSD or HDD 2.5 vertically on HDD_Holder.stl
- Attach HDD_Holder.stl and Top_HDD.stl with screws.
- Fasten Top_HDD.stl to Top.stl with M4 bolts.The front panel has holes for the Power and Reset buttons, as well as holes for 4 USB ports.Button Power with a diameter of 16 mm. Button Reset with a diameter of 12 mm.Two dual USB ports must be installed on a board 40-46 mm wide and up to 30 mm long. The board is inserted into the corresponding slots in Front.stl.