20 Jul 2023
Mastering the 3D Printing Workflow: From Concept to Completion
Insight

In a world where technology is constantly evolving, 3D printing stands out as a unique blend of art, science and technology. From professionals to hobbyists this technology has been transforming everything from product prototyping to art and custom jewelry making. But what exactly is it? It is simply a process that creates three dimensional objects from a digital file with the use of a 3D printer. This process is also characterized as additive since it works by laying down layers of material until the entire object is built. Each layer can be seen as a sliced horizontal cross-section of the final object. One of the most amazing aspects of 3D printing is its ability to produce complex shapes and designs that would be difficult, if not impossible, with traditional manufacturing methods.

Now, you might be wondering, "Sounds great, but why should I learn about the 3D printing workflow?" Well, the journey from a concept to a 3D printed object is a bit like an expedition. Without a map or, in this case, a well understood workflow, you can quickly find yourself lost in a sea of confusing software and technical terms. But fear not! A solid understanding of the 3D printing workflow will not only save you time and frustration but will also open up a world of creative potential right at your fingertips.
By mastering the 3D printing workflow, you will be able to understand each step of the process and how they connect to one another, helping you efficiently transform your ideas to designs and then into actual physical objects. This knowledge will allow you to troubleshoot issues, optimize your prints and most importantly turn your ideas into reality in a more effective and enjoyable way.So, buckle up, our journey through the exciting world of 3D printing is about to begin.
The world of 3D printing can seem a bit like a maze at first glance, with its labyrinth of software options, hardware types, and cryptic terminology. But have no fear, because we are here to shine a light on the path. The key to navigating this maze is understanding the 3D printing workflow, which is the series of steps that guide your concept from the realms of imagination into the land of reality.
The 3D printing workflow is a magical journey that takes you through five primary stages:
This is the birth of your idea, the initial spark that lights the 3D printing fire. It’s the "What do I want to create?" stage. Whether you're planning to print a custom phone case, a piece of jewelry, or a prototype for a new product, it all begins in your imagination. This stage involves jotting down your ideas, perhaps sketching some preliminary designs, and thinking about how your object will be used and what features it needs to have. It's all about defining what you want to achieve with your 3D print. So, get creative, think outside the box, and let your imagination run wild!
Next, you transform your concept into a digital 3D model using the modeling software of your choice. Feel free to refer to our guide about the most popular 3D software for 2023 in the case you haven’t yet made up your mind. Don't worry if you're not a professional designer; many of these programs offer excellent tutorials and resources to help you get started. In this stage, you're like a digital sculptor, molding your idea into a detailed 3D representation.
Your beautiful 3D model must be translated into a language that your 3D printer understands. This process is known as slicing, and it involves cutting your model into thin horizontal layers that your printer will build one at a time. Slicing software (like Cura or Slic3r) takes your 3D model and slices it into hundreds or even thousands of horizontal layers. In doing so, it generates a file that your 3D printer can understand, telling it exactly where to deposit material.

Now the real magic happens. Your 3D printer takes the information from your sliced model and brings it to life, layer by layer. The materials used, printing speed, and quality can all vary significantly depending on your specific printer and the settings you choose. It's a bit like baking a cake, but instead of flour and sugar, you're using plastic filaments, and the oven is your printer!
Congratulations, your print is complete! But you're not done yet. The final stage of the workflow is post-processing, which involves any finishing touches your object might need. This could include sanding to smooth out rough edges, removing supports (extra material added during printing to prevent overhangs from drooping), or painting to make your object look just right. This is the stage where your 3D printed creation really comes to life.

Each of these stages is an essential piece of the puzzle that, when put together, forms the complete picture of 3D printing. By understanding each stage, you can unlock the true potential of your 3D printer and bring your wildest ideas to life.
But remember, as with any new skill, practice makes perfect. So, don't be afraid to experiment, make mistakes, and most importantly, have fun! Now, it is time to dig deeper into the stages of the 3D printing workflow with the goal to better understand their significance as well as their interconnections.
Just like a painter first imagines the landscape before picking up their brush, or a sculptor sees the figure hidden within a block of marble before making the first chisel strike, your 3D printing journey begins long before your printer starts humming. It starts with an idea. This stage, known as the conceptualization stage, is the genesis of your 3D printed masterpiece.
Conceptualization is the process of defining what you want to create. This could be something functional, like a spare part for your car, a piece of jewelry, or a product prototype. Or it could be something purely artistic, like a statue or a unique home decor piece. During this stage, you should consider a few essential questions:
The conceptualization stage involves brainstorming, sketching, and extensive planning. It's the stage where you take a thought, an idea, an imagination and start shaping it into a tangible form.
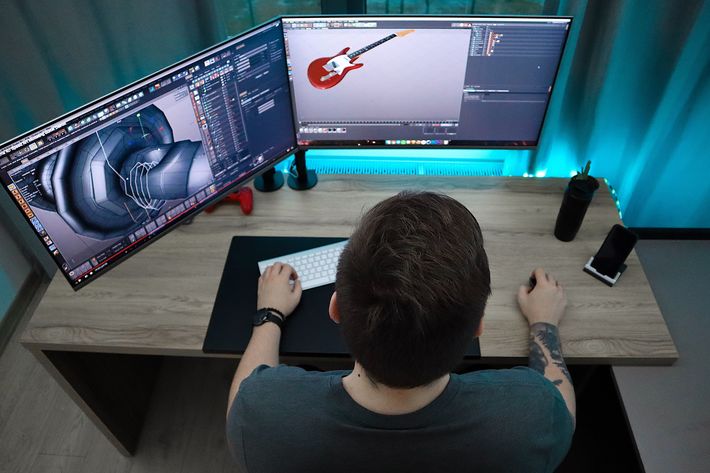
After successfully navigating the conceptualization stage and solidifying your idea, it's time to bring that idea into the digital world. Welcome to the design stage, where your concept is transformed into a detailed 3D model. This is where the fun really begins!
The design process is where you translate your concept into a detailed 3D model using specialized software. This might sound daunting, especially if you've never done it before, but don't worry. Like learning to ride a bike or cook your favorite dish, it's a process that becomes more comfortable with practice. If you are new to 3D design you can always refer to our guide regarding the absolute fundamentals of 3D modeling. We are confident that it can help you kickstart your modeling journey as it’s full of concentrated knowledge and advice by the industry's best!
Remember, there's no rush. Take your time, and don't be afraid to experiment and make mistakes. Every error is a learning opportunity that brings you one step closer to mastering 3D design.
As you translate your concept into a 3D model, there are several crucial elements to keep in mind:
Remember, all these elements can significantly influence your print's success and the quality of the final object. Each aspect plays a significant part in bringing your 3D concept to life in the best possible way. Always consider these elements during your design stage to ensure a smooth transition to the next stage of your 3D printing journey.
When it comes to creating your 3D models for printing, there are several software tools available, each catering to different needs and skill levels. Let's take a look at four popular ones:
The choice of software depends on your needs, your experience, and the complexity of your designs. Tinkercad can help beginners get their feet wet, while Blender provides a more robust, cost-effective platform for advanced design exploration. 3ds Max and Maya, while carrying a learning curve and cost, can be worthwhile investments for those involved in professional or intricate projects. You can always refer to our extensive guide for more information on the most popular 3D software of 2023.
Remember, regardless of the software you choose, mastering 3D design requires time, patience, and consistent practice. But with each step, you're bringing your ideas closer to reality.
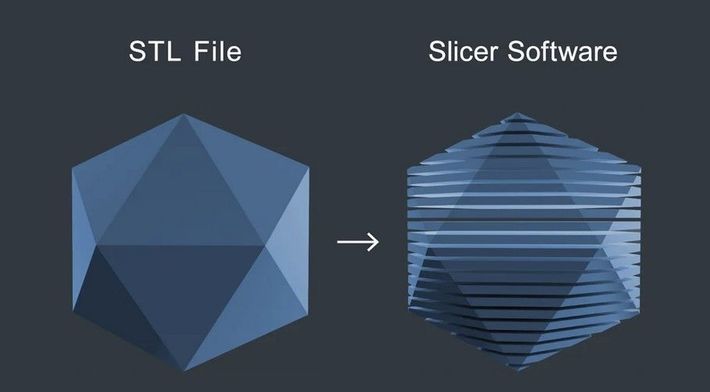
Having designed your 3D model, you are now ready to prepare it for printing. This process, known as slicing, is what transforms your digital model into instructions that your 3D printer can follow. Let's delve into what slicing is, why it matters, and some software you can use to get the job done.
In the context of 3D printing, slicing does not involve a knife! Instead, slicing software takes your 3D model and 'slices' it into hundreds or thousands of horizontal layers. These layers are what your 3D printer will lay down one at a time to create your final printed object.
Slicing software will also generate a G-code file from your model. G-code is essentially a series of instructions that guide your 3D printer. It tells the printer where to move, how fast to move, what temperature to operate at, and when to extrude material.
Slicing is a crucial step in the 3D printing process. The quality of slicing can significantly affect the success of your print. Too thin, and your print could take forever and lack strength. Too thick, and your print might lose detail or fail altogether.
Effective slicing also considers factors like the type of material you're printing with, the speed of your printer, and the level of detail your model requires. Each of these aspects can influence the settings you'll use when slicing your model.
Choosing the right slicing software can make a big difference in your 3D printing experience. Here are a few recommendations:
PrusaSlicer is a robust and intuitive slicing program that's compatible with most 3D printers, not just Prusa models. Here's how you can slice a model using PrusaSlicer:
In essence, the slicing stage is like a translator, converting your 3D model into a language your 3D printer understands. By understanding and mastering slicing, you're equipping yourself with a powerful tool in your 3D printing arsenal, ensuring that your prints come out as close to your designs as possible.
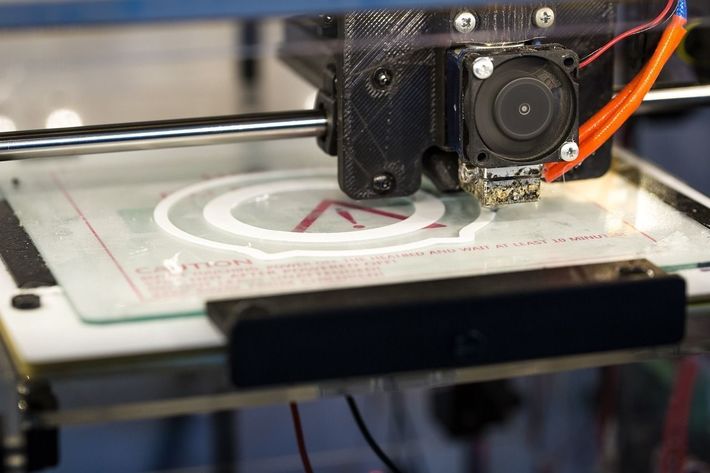
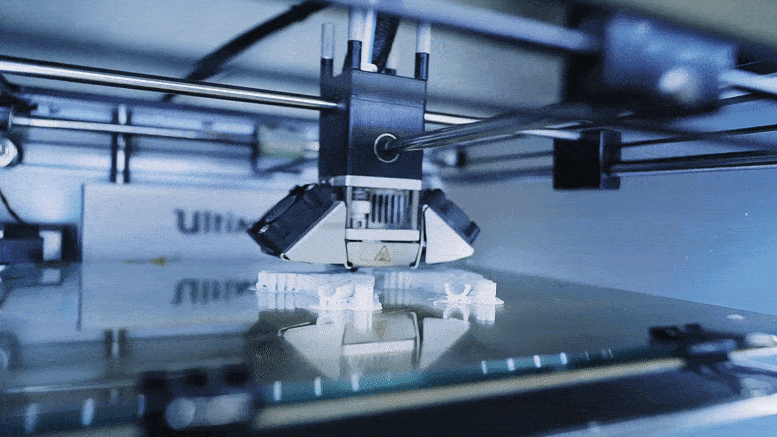
After your model has been designed, and your slicing software has prepared it for printing, it's time to bring your creation into the physical world. Let's delve into what 3D printing involves, some of the common technologies used, and recommended 3D printers for different levels of users.
3D printing is the process of creating a three-dimensional object from a digital file. This is achieved through an additive process where an object is created by laying down layers of material until the entire object is formed. Each of these layers can be seen as a thinly sliced horizontal cross-section of the final object.
Once you've loaded your G-code file into your 3D printer, the printer heats up to the necessary temperature and begins extruding the print material layer by layer, following the instructions in the G-code file. The extruder head moves, allowing the object to be built up vertically.
Now, let’s quickly go through the most common problems you may face while printing, along with some easy fixes.
A. Warped or Lifted Prints: This occurs when the print doesn't adhere properly to the print bed, causing the corners to lift and warp.
Fix: Ensure the print bed is level and clean before starting a print. You may also want to adjust the bed temperature or use an adhesive solution like hairspray or a glue stick to improve bed adhesion.
B. Stringing or Oozing: This is when thin strands of filament are left behind as the print head moves, creating a "stringy" appearance.
Fix: This can often be resolved by adjusting the retraction settings in your slicing software. A higher retraction speed and distance will help pull the filament away from the nozzle during movement.
C. Poor Layer Adhesion: If the layers of your print are not adhering well to each other, it could result in a weak print that's prone to breaking.
Fix: Increasing the print temperature can help improve layer adhesion, as it allows the layers to fuse together more effectively. Reducing the print speed may also help, as it gives the layers more time to bond.
D. Over-Extrusion: Over-extrusion is when too much filament is extruded, leading to messy prints with excess material.
Fix: Check your filament diameter settings in your slicing software to ensure they match your actual filament. Also, verify that your extruder's steps-per-mm settings are correctly calibrated.
E. Under-Extrusion: The opposite of over-extrusion, under-extrusion occurs when not enough filament is extruded, causing thin layers or gaps in the print.
Fix: Make sure your filament isn't tangled or obstructed, and check that your extruder gear isn't worn or slipping. It could also be due to a clogged nozzle, which may need to be cleaned or replaced.
Troubleshooting is part of the 3D printing journey. The more you print, the better you'll understand your printer, and the more equipped you'll be to overcome these challenges. Remember, patience and persistence are key. Happy printing!
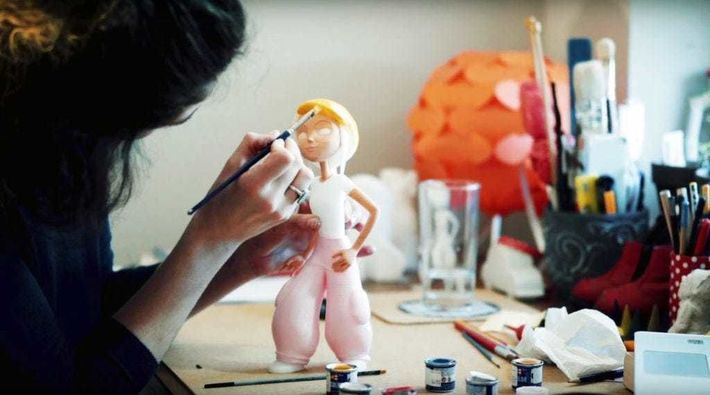
After your 3D model has come to life and your printer hums its satisfaction, the journey isn't quite over. That's where post-processing steps in: the final touch to refine your print and make it truly shine.In essence, post-processing is about enhancing the quality of your prints, removing unwanted artifacts, and even adding aesthetic touches. It's like the photo editing of 3D printing – refining, correcting, and beautifying your creation.
Proper post-processing can significantly enhance the quality of your 3D prints. It can make the difference between a rough prototype and a polished final product. It's an essential part of the 3D printing process, ensuring the functionality and longevity of the printed object, and in many cases, bringing the fine details to life.
Now let's explore the variety of techniques available to you in the post-processing stage. Each 3D printed object is unique, and thus might require different post-processing methods. Here, we'll break down some common techniques and tools you might use:
Once your print is off the build plate, it's time for a bit of a cleanup. This stage involves removing any support structures used during the print. For FDM prints, these can often be removed by hand or with a pair of pliers. If you're working with SLA prints, you'll need to remove the supports carefully to avoid damaging the print.
Also, if you're using an SLA printer, your print will need to be bathed in isopropyl alcohol or a similar solvent to remove excess resin. This process is called post-curing and involves exposing the print to UV light, either from the sun or a UV curing station, which fully hardens the resin.

Sanding is the manual process of refining the surface of your print to achieve a smooth finish. It involves using a variety of sandpaper grits, starting with a lower number (coarser) and working up to higher numbers (finer) for the best result.
A rotary tool can also be used for hard-to-reach areas or for more aggressive material removal. Remember to always sand in a well-ventilated area and consider wearing a mask to avoid inhaling any plastic particles.

Before painting, applying a primer can help to smooth out any remaining layer lines and provides a surface that paint can adhere to easily. Primers are typically applied with a spray can and should be done in a well-ventilated area.
Painting is where the real magic happens, as you bring your print to life with color. Acrylic paints are commonly used due to their quick drying time, ease of use, and water solubility. For detailed work, you may choose to use a fine paintbrush, while larger areas can be tackled with a broader brush or even airbrushing for an even coating.
If your print was too large for your build plate and you had to print it in parts, this stage involves assembling the pieces together. Cyanoacrylate glue (often known as superglue) is commonly used for this, although some plastics may require a specific type of glue.
For certain materials like ABS, a process called 'welding' can be used. This involves using a solvent such as acetone to slightly melt the surfaces of the parts, which are then pushed together to bond.

The final step in post-processing is finishing. This could be as simple as applying a clear coat to protect and enhance the paint, or as detailed as using a technique such as weathering to give the print a used or aged appearance. Other finishes such as gloss or matte can be applied to give the print the desired aesthetic.
Remember, the post-processing phase is an art in itself. Each technique requires practice, and not all prints will require every technique. With time, you'll learn which processes work best for your prints and develop your own post-processing style
And there you have it, a tour through the landscape of 3D printing, taking you from the spark of an idea to an actual object that you can hold in your hands. It’s not just about going from point A to point B, but the journey itself, discovering the magic of bringing your ideas to life one layer at a time.
Mastering this workflow is a lot like getting the keys to a whole new world of creativity. It opens doors to innovation, allows you to personalize the world around you, and equips you with a skill set that is becoming increasingly invaluable in our tech-driven world. With every twist and turn in this process, you're not just creating an object; you're honing your skills, learning to problem-solve, and continuously evolving as a creator.
But don't just stop here; the realm of 3D printing is vast, dynamic, and forever evolving. There's always something new on the horizon, a fresh challenge to undertake, a different technique to master. Each step, each layer, and each successful print is another page in your story as a maker.
So, what are you waiting for? Jump in, embrace the process, make mistakes, learn from them, and most importantly, have fun. Because in the world of 3D printing, the real magic lies in the process as much as in the product. Now, it's your turn to take this knowledge, transform your ideas into reality, and add a whole new dimension to your creative journey. Don’t know what to print first? Why not some 3D-printable useful everyday items or even some fun 3D prints with an educational side? So go on, fire up that printer, and let's start creating!


Comments